
How to Mix Vocals Like a Pro With Just Stock Pro Tools Plugins (No Paid Add-Ons Needed)
By Dylan Droll — Artist, Songwriter & Mix Engineer
Let me tell you something straight up — you don’t need $1,000 worth of plugins to make your vocals sound clean, professional, and radio-ready. When I first started out mixing vocals, I didn’t even know what a “third-party plugin” was. All I had was Pro Tools and the default stock plugins it came with… and guess what? That was enough to start leveling up my sound.
In this guide, I’ll break down how to mix vocals with stock plugins in Pro Tools — the same way I did it when I was starting out (and honestly, still do when I’m working fast or on a budget). This walkthrough is perfect for rappers, singers, and beginner engineers looking to mix vocals using only Pro Tools plugins.
Step 1: Get Your Gain Staging Right
The most underrated step in every vocal mix. Before adding any EQ, compression, or effects, you need to make sure your vocal isn’t recorded too hot or too quiet. I like to keep my vocal levels peaking around -12dB to -6dB using the stock meters or clip gain feature in Pro Tools.
Pro Tip: Use the Clip Gain line in Pro Tools to adjust volume visually — it’s a game-changer for cleaning up inconsistent takes.
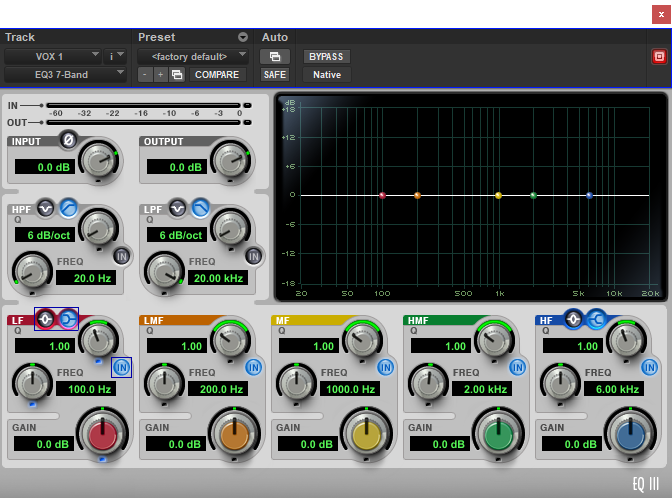
Step 2: EQ With EQ3 7-Band or Channel Strip
Now it’s time to clean up the mud and harsh frequencies. I usually roll off everything below 80Hz, then dip around 250–500Hz if it sounds boxy. Use EQ3 or Channel Strip — both are amazing stock plugins that come with Pro Tools.
This is where I always reference a mix I love — whether it’s Rod Wave, The Kid LAROI, or one of my own tracks like “Almost” or “All Away”.
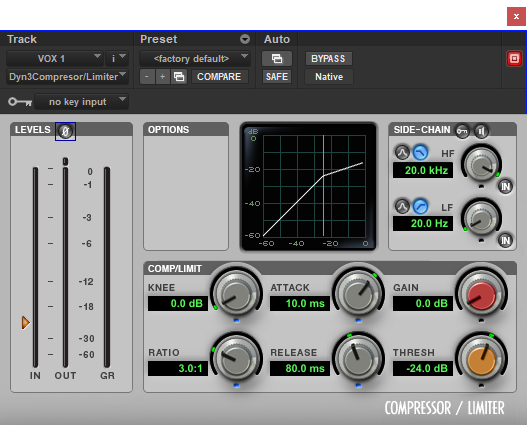
Step 3: Compression Using Dyn3 or Channel Strip
I usually use two stages of compression with stock plugins — one with a gentle 3:1 ratio and another slightly more aggressive to lock in the vocal. Dyn3 Compressor/Limiter still holds up today. Channel Strip also has great built-in compression if you want to simplify your chain.
Key phrase to keep in mind here: stock plugin compression Pro Tools vocals — because that’s exactly what’s making your vocal pop without extra gear.
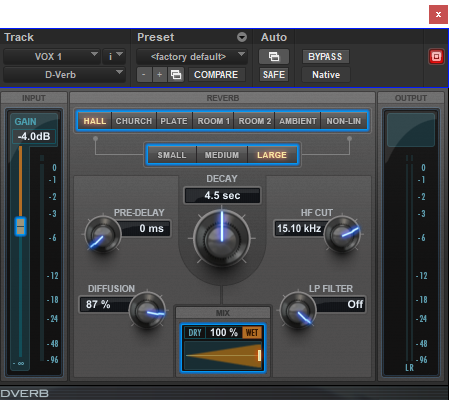
Step 4: Reverb and Delay with D-Verb and Mod Delay III
Even though these stock FX aren’t flashy, they get the job done. I use D-Verb on a send (pre-fader) to add depth to vocals, especially when mixing melodic rap and R&B. For delays, Mod Delay III gives me enough control for slapback or subtle echoes.
Want your vocals to feel wider or more emotional? Automate the delay levels in certain parts of the verse or chorus to add energy.
Step 5: Volume Automation + Final Polish
This is where you take your mix from “pretty good” to “pro-sounding.” Automate your vocal volume for consistency and dynamics. You can also use fades and Clip Effects for minor tuning or brightening.
Bonus Tip: Build a Reusable Stock Template
If you’re recording often, create your own Pro Tools stock plugin vocal chain template so you’re not starting from scratch every time. You can even download my custom templates here: dylandroll.com/services
What I Use Now (And What I Recommend When You’re Ready to Upgrade)
Even though I still mix with stock tools, I eventually added Waves Audio plugins to my setup — especially for tuning, multiband compression, and de-essing. They offer a free trial if you want to try them before committing.

If you’re just starting out, here are a few free trials and tools I always recommend:
- 🎛️ Pro Tools Free Trial
- 🎚️ Waves Audio Free Plugin Trial
- 🎧 Amazon Music Unlimited (Free Trial)
- 🚀 DistroKid — Distribute Your Songs Everywhere
- 🛒 My Amazon Gear List for Home Studio Setups
I only recommend things I personally use or trust. Some of these links are affiliate links, so if you sign up, you help support me (at no extra cost to you).
Final Thoughts from Dylan Droll
Whether you're using Waves plugins or sticking to stock tools, remember this — it’s not about the gear, it’s about your ears. Every pro engineer started somewhere, and most of us started broke.
So don’t let anyone tell you that you need fancy software to make your music sound dope. You just need drive, consistency, and the willingness to learn.
Thanks for reading — I hope this guide helps you level up your mix today. More free tips, templates, and tools dropping weekly at dylandroll.com.